
5 Pro Designer Tips For Organizing Your Squarespace Pages

If your site has more than five pages, designing your website might have you constantly questioning its efficiency and readability for visitors. You might catch yourself feeling unorganized or even just regularly wondering if there is a more efficient way to display your content. This may be more true if you have a shop or a blog that requires multiple pages of items.
I’ll list below my 5 tips for creating optimal, functional organization in Squarespace. And for further info on how to manage pages and content, we have additional resources for simplifying your development efforts and overall organize your site better.
Table of Contents in Detail Hide
Tip 1. Create Folders
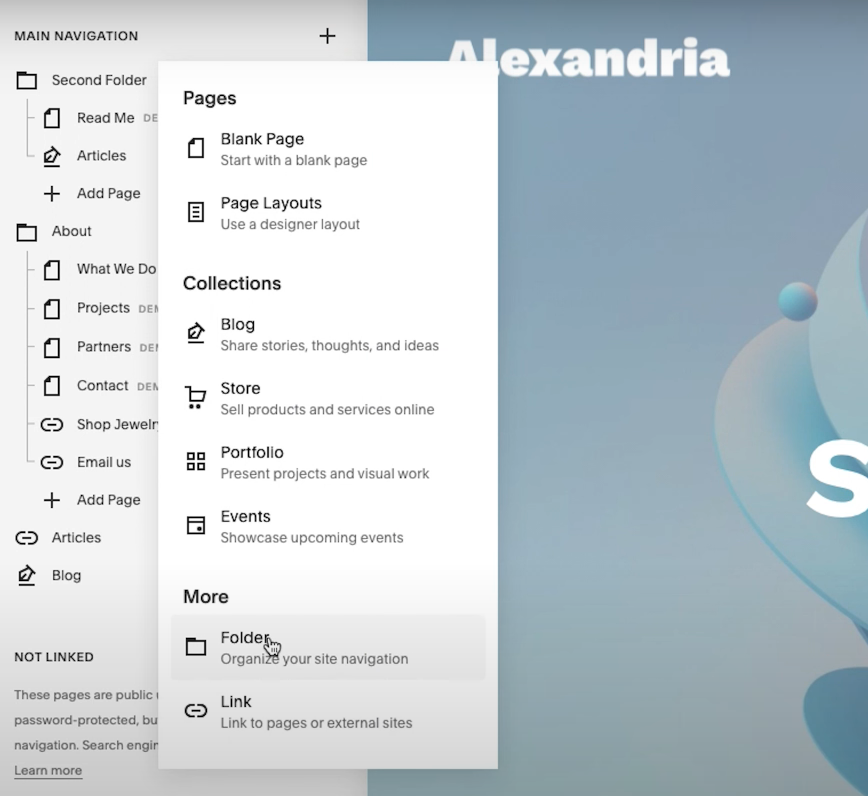
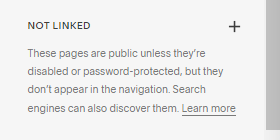
Folders are great organizational tools. Once you get to Squarespace 7.1, click on Pages. If you see a page that shows up as Not Linked, this simply means that the page works, but it is not included in the main navigation.
To create a folder, do the following:
Click on Folder.
Name it.
When you refresh the page, you’ll see the folder name show up.
At this point, the folder exists but is empty.
Click Add Page.
Press the forward-slash to bring up all your options.
Add the page of your choice.
Now your folder has a page.
You can add more pages to your newly created folder.
Tip 2. Use Links
We recommend that you use links as much as possible. This can be so helpful in many different cases. For example - say you have an ecommerce store with five categories. You can use links to conveniently list those categories under your navigation. This can make life so much easier for your website visitors and for whoever maintains your Squarespace site on an ongoing basis. Try this out by going through the following steps.
Momentarily leave the editor.
Locate the URL and highlight everything after the .com.
Copy what you’ve just highlighted.
Go back into the editor.
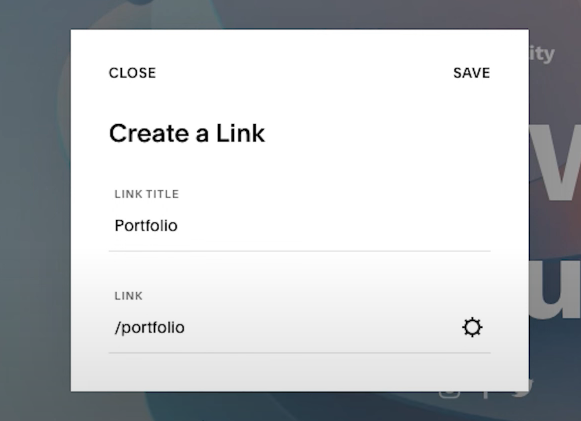
Click Add Page, which is really a link.
Type in your project name and paste the highlighted portion of the URL you previously copied into the Link field.
Now you’ve added your project; be sure to Save.
When you go back to the homepage and check the navigation bar, you’ll see this project appear as a page.
I want to emphasize that setting up your URL structure in a systematic, organized way from the beginning is very important. Doing so will save you time in the long run and help you stay well organized.
Tip 3. Active & Inactive Pages
Unused pages can weigh a site down, confusing anyone on your team who accesses your site. Organizing your active and inactive pages in a logical manner will help whoever’s working on your site find their way around more easily.
Follow these steps:
Click the plus sign in the Not Linked section.
Create a folder.
Call this new folder “Active Pages.”
Repeat the previous steps to create a second folder called “Inactive Pages.”
Drag all your inactive pages to your Inactive Pages folder.
Also be sure to disable any of these old, inactive pages you are no longer using so that they don’t show up on Google. (You can disable a page from Page Settings.)
Similarly, drag all your active pages to your Active Pages folder.
You can also create a third folder called “Miscellaneous” for storing pages like Thank You and Privacy.
Having these two folders (Active Pages and Inactive Pages) will help you keep things organized, enabling you to easily find active pages while storing away inactive ones. Rest assured, throwing pages into these folders that you’ve created in the Not Linked section doesn’t change your website, so the end user is not affected. This is just a means to help YOU stay organized and enjoy a better development experience. You can follow this tip for your pages AND for your items, too!
Tip 4. Creating a Page When the Site Is Live
If you want to add something to the main navigation, you may not want to do so while the site is active, or live. So instead of adding it to the main navigation, you can create it in the Not Link section. Here are the steps to follow.
Click the plus sign in the Not Linked section.
Choose a page layout to create a new page.
Make any adjustments you want to the page, editing it until you get it to the exact look and feel that you want.
Drag the page up into the main navigation when you are ready.
Drop it in the active folder.
If you have an old version of the page, you can drag the old one into the inactive folder.
By following this approach, you can work in the background in the Not Linked section, taking your page to the main navigation only once you’re ready for it to go live.
Tip 5. Email & Call Links

There are two other things you can do within your main navigation that sometimes get overlooked: adding email and phone links. You can use the same process for both, calling one “Email Us” and the other “Call Us.”
Go into a folder you’ve created and click on Add Page.
Click on Add a Link.
Name it “Call Us” or “Email Us.”
For the Link field, click on the settings wheel.
You’ll see all the options you need, including Email and Phone.
Fill in the respective field with either your phone number or your email address.
Hit Save.
Now, when someone clicks on that link, it will trigger the ability to call or email you directly.
Turn to Us If You Get Stuck
We hope you’ve benefited from these Squarespace organization tips. We exist to help business owners, freelancers, entrepreneurs, and designers like you create an attractive, effective online presence quickly. If you get stuck on anything in the Squarespace platform, chances are our team has already encountered this very same issue and created a solution. Pick our brains for answers so you can keep moving forward with your business development goals.
Access a wide range of free guides that can help you with your Squarespace site development, including how to optimize for SEO.
Be sure to sign up for our monthly newsletter for additional tips and tricks you can use.